How to downgrade Windows 11 to Windows 10, Windows 11 might be the latest, but it’s possible that you may not agree that it’s the greatest operating system Microsoft has to offer. And that’s fair. After all, Windows 11 has had its fair share of bugs and issues. And in your own comparison between Windows 10 and Windows 11, you might think you’d rather go back to Windows 10. If that’s the case, we can help you navigate the downgrading process.
Microsoft makes it simple enough to revert directly through the Windows 11 settings page. That’s because, upon upgrade from Windows 10, Windows 11 actually stores a copy of Windows 10 on your PC for 10 days so you can go back to it. Do keep in mind that if you go back to Windows 10 from Windows 11, you might have to reinstall some apps and programs. Anything you saved on your PC while Windows 11 also won’t carry over back to Windows 10, either.
How to downgrade from Windows 11 to Windows 10
The first part of our guide also only applies if it has been 10 days or fewer since you upgraded to Windows 11. If it’s been the past 10 days, then we have some advice for you in the next section of our article. This all might sound scary, but don’t worry. This is what our guide is for.
Step 1: To begin the process of downgrading Windows 11 to Windows 10, you’ll want to head into Windows 11’s settings page. Hit Windows Key and I on your keyboard while in any app, or on your desktop.
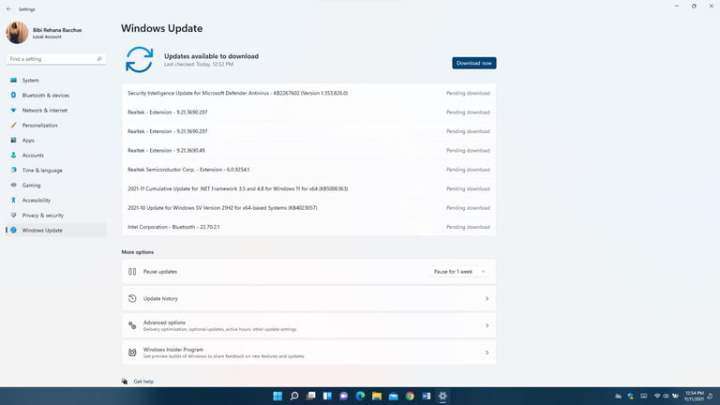
Step 2: After that, select Windows Update in the sidebar. This is where you’ll want to be for our next few steps. You might notice that Windows Update is home to everything relating to software, device updates, scheduling, or even joining the Windows Insider program. You don’t need to think about those for now, as the focus will just be on Update history in the next step.
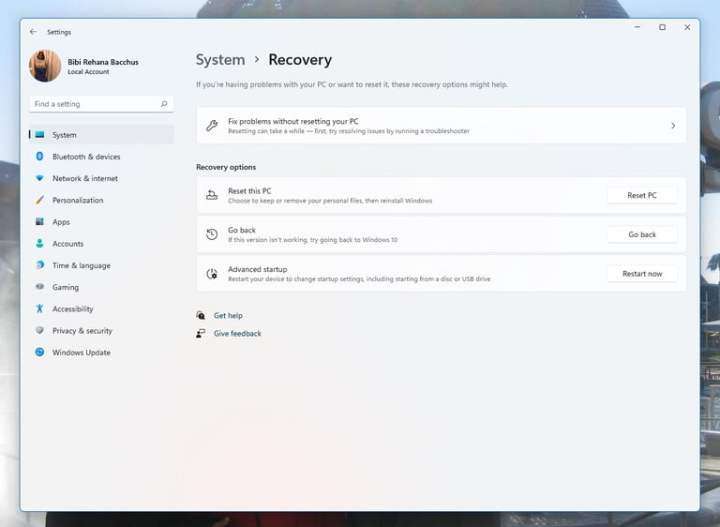
Step 3: Next up, you’ll want to select Update history in the middle of your screen. You might need to scroll down to see it. Once there, scroll down past the list of installed updates to get to Recovery.
Going back to Windows 10 involves using the previously mentioned backup that Windows 11 generated and Recovery will be the home for this. Again, keep in mind that you’ll only see the option to go back if it is within 10 days since you upgraded to Windows 11. After 10 days, the option disappears, and you’ll need to see another option at the end of our guide.
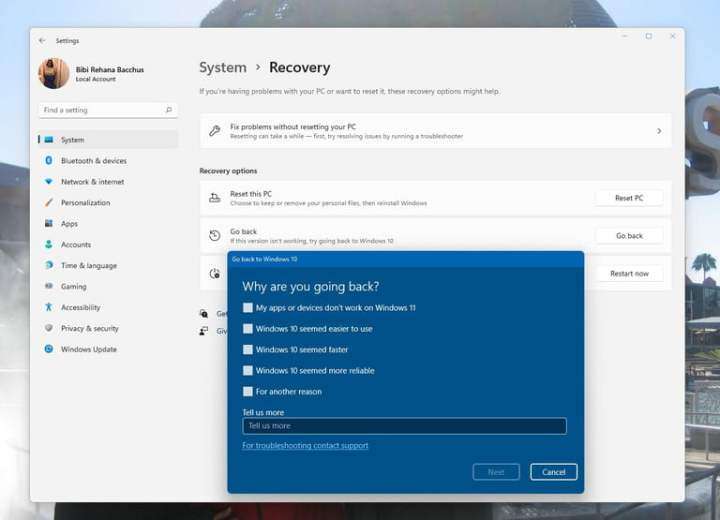
Step 4: Once you select the Go back button, Microsoft will prompt you as to why you’ve decided to go back to Windows 10. You can pick any one of the options on your screen, or type your own answer. Your answer helps in Windows 11’s development process. Once filled out, choose Next at the bottom.
Windows 11 will then ask you if you want to check for updates. These might help fix the problems you’re having (like the performance issues with AMD GPUs,) so try to give it a shot. If that doesn’t work, you can come back following the previous steps, and choose No, thanks.
Microsoft will warn you of the things relating to data that we mentioned at the top of the piece, and you can accept by selecting Next. Also, keep in mind you’ll need to remember your password to sign in to Windows 10, so don’t forget it. Select Next again to confirm.
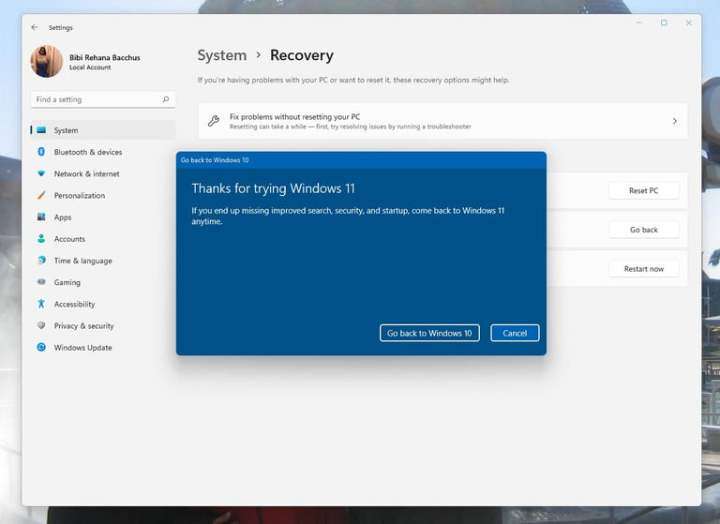
Step 5: After you select Next a few times, Windows 11 will give you the Go back to Windows 10 button. Choose this, and Windows 11 will do its magic. Your PC will roll back to Windows 10 automatically. Depending on the speed of your PC, it should take less than 5 minutes on average. Your PC will restart about two times, and once it does, you’ll be taken right back to your Windows 10 desktop.
How to downgrade from Windows 11 past 10 days
If it’s been more than 10 days since you upgraded to Windows 11, then the method we mentioned above will not work. To go back to Windows 10, you’ll have to do what’s known as a “clean install” of the Windows operating system. This involves erasing everything off your PC, and starting from fresh, so be sure to back up your files.
The easiest way to do this is to visit Microsoft’s Windows 10 download page on your Windows 11 PC and look for the Create Windows 10 installation media option. Download the tool, open it, and then follow the steps on the screen. You’ll want to make sure you choose the option to Upgrade this PC now. Follow all of the prompts on your screen and Windows 10 will install, putting your PC back in time to when it was new.
How to downgrade Windows 11 to Windows 10
Read Also : The 5 best floodlight cameras in 2024
Frequently asked questions
Can Windows 11 be downgraded to Windows 10?
Yes, Windows 11 can be downgraded to Windows 10 and there are two main options for doing so: using the Go Back option in Settings to roll back the upgrade to Windows 11 or performing a clean install of Windows 10. The first option is only for those who upgraded to Windows 11 within the last 10 days. So basically, if you upgraded your Windows PC to Windows 11, you have 10 days to use the Go Back option in Settings to downgrade your PC back to Windows 10. If it’s been more than 10 days, you’ll need to perform a clean install of Windows 10. You can find instructions for either method in the previous sections of this article.
Why is “Go back” no longer available?
If the Go Back option appears to be grayed out in your PC’s Windows Settings, then that means it’s been more than 10 days since your PC was upgraded to Windows 11 and you missed the deadline for using this option to roll back the Windows 11 upgrade.
Can I downgrade from Windows 11 to 10 after 10 days?
Yes, you can downgrade from Windows 11 to Windows 10 after 10 days. But doing so requires a different method: performing a clean install of Windows 10. Be sure to follow the instructions for performing a clean install of Windows 10 described in the previous section.
How to start Windows 11 in Safe Mode
If your Windows 11 PC is having issues, one way to troubleshoot those issues is start your PC in Safe Mode. Safe Mode is essentially a very basic version of Windows 11, without all the bells and whistles and only a restricted set of features, drivers, and files. This mode essentially lets you take a look at your computer and helps you figure out exactly what issue is plaguing your PC.
But booting into Safe Mode on Windows 11 isn’t as easy as just pressing a single button. You’ll need to navigate through a series of menus first and the method for getting there depends on your PC specific situation (Is your PC still working or is it just a blank or black screen?).
Regardless of your current situation, we can show you how to boot Windows 11 into Safe Mode. Let’s take a closer look at Safe Mode and how to get there.
The different safe modes

Before we jump into explaining how you get into Safe Mode, we just want to touch on the different versions of the diagnostic mode. There are three different Safe Mode versions in Windows 11. Each of these can be used for different diagnostic purposes. These are explained for you below.
Getting to Safe Mode from login on Windows 11
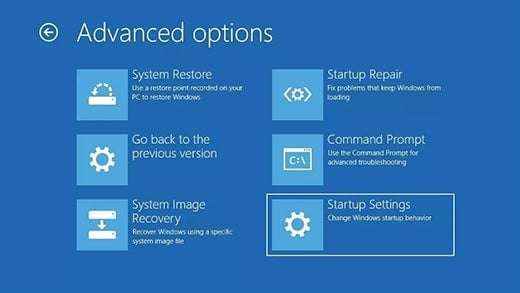
If you can still get into Windows 11 and your PC isn’t entirely broken, one of the easiest ways to activate Safe Mode on Windows 11 is from the login screen. You can do this by following our steps below.
Step 1: Hold down the Shift key and click on the power button icon in the lower right corner of the screen.
Step 2: Continue to hold Shift and choose Restart.
Step 3: Release the key afterward. The PC will then restart. If you have Bitlocker encryption turned on, you might have to enter the key.
Step 4: Once you see the Choose an option screen, choose the Troubleshoot option.
Step 5: From there, choose Advanced options, and then choose Startup settings.
Step 6: Pay attention to the prompts on the screen and then select the Restart button.
Once the PC restarts, there will be a list of options on the screen. Be sure to select the option you want, pressing the respective key on the keyboard. Each number on your keyboard will correspond to a respective Safe Mode. These numbers might vary by PC, so pay attention to what’s listed on the screen. You’ll only have a few seconds to make a choice before the Safe Mode prompt times out.
Get into Safe Mode from a black screen or broken Windows 11 PC
In the event that you can’t get into Safe Mode on Windows 11 from the login screen, you can do so by turning your device on and off again, until it forces you into the Windows Recovery Environment. This is an environment built into a special place on the storage drive of most new PCs, allowing you to restore or fix issues with Windows. You can get into the Windows Recovery Environment with our steps below.
Step 1: Hold down the power button for 10 seconds to turn off your device.
Step 2: Press the power button again to turn on your device.
Step 3: If you see that Windows has started and see the logo of your PC maker, hold down the power button again for 10 seconds to force turn off your device.
Step 4: Press the power button again to turn on your device.
Step 5: When Windows restarts, hold down the power button for 10 seconds to turn off your device.
Step 6: Press the power button again to turn on your device.
Step 7: Allow your device to fully restart and you’ll be taken to the Windows Recovery Environment.
Once you’re taken into the Windows Recovery Environment, you can follow our steps in the section above (starting from Step 4) to get into Safe Mode.
Get into Safe Mode directly from Windows 11
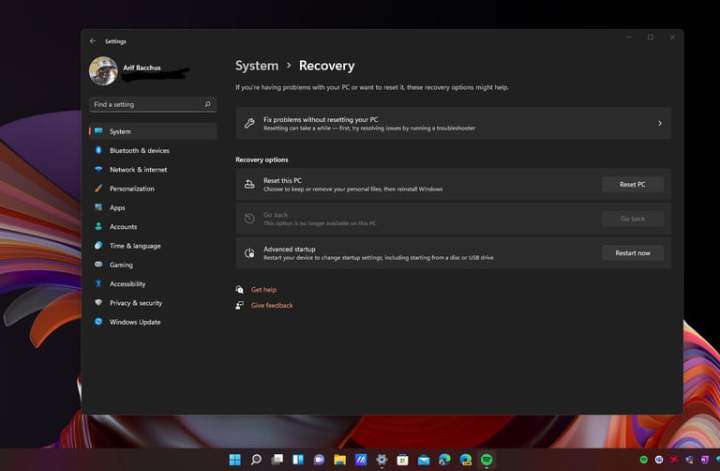
A third way of getting into Safe Mode can happen directly from Windows 11. You can do this by following our steps below. Just keep in mind that this option will require you to have a fully working PC.
Step 1: Select the Start menu and search for Settings.
Step 2: Select System in the side menu on the right of the screen, then choose Recovery on the left. (You may need to scroll down first.)
Step 3: Scroll down and find Advanced startup, then select the Restart now button.
Step 4: Follow the steps in the second section of this article, starting with Step 4.
How to exit Safe Mode
After you diagnosed and resolved your Windows 11 issue, you can restore your PC to its original state and exit Safe Mode. This is as simple as restarting and shutting down your device as you normally would. There’s no need for extra steps.
Frequently asked questions
What is Safe Mode?
Safe Mode is a mode in which you can run a basic version of Windows, a version that only uses some drivers and files. Running your PC in Safe Mode is a great way to troubleshoot issues with your computer.
What button do I press to boot into Safe Mode?
Before you can even press a button to boot into Safe Mode, you’ll need to follow one of the methods outlined earlier in this article that will get you to the menu that allows you press that button.
Once you reach that menu, you’ll be presented with a list of options. Here are the main ones for booting into Safe Mode in Windows 11:
How do I boot into Safe Mode on Windows 10?
Booting into Safe Mode on Windows 10 is not that much different from doing so on Windows 11. But if you need a thorough guide to help you navigate the steps, you should check out our guide on how to boot into Safe Mode in Windows 10.
How to boot into safe mode in Windows 10
Safe Mode is a way of opening up a limited version of Windows. Doing so allows you to get around bugs or avoid viruses while troubleshooting problems with your system, making it safer for you to work on issues affecting the core of your computer.
On older systems, you can boot into Safe Mode by starting up your computer and pressing F8 when Windows first loads. However, Microsoft‘s latest iteration of Windows doesn’t follow this rule. So how do you turn on safe mode in Windows 10? This guide explains everything you need to know.
Which safe mode do you want?
On Windows 10, there are a few different types of Safe Mode you can choose from, so it’s important to know what they do and which you need.
Method 1: From the login screen or when frozen
If you are still on the login screen, this is an effective way to quickly boot into Safe Mode — and it may also work if Windows has suddenly frozen or programs like Outlook have become unresponsive.
Step 1: From the login screen, hold down Shift, and then click the power button on the screen (not your physical power button on the PC or laptop). A small box should pop up with a few different shut down options. Choose the Restart option.
 Image used with permission by copyright holder
Step 2: Windows should revert to a window that says Choose an option (it may take a little time so don’t try anything until you see this). From here you will need to go through a few different menus to find the right restart option. First choose Troubleshoot, then Advanced options, then Startup Settings, and then Restart.
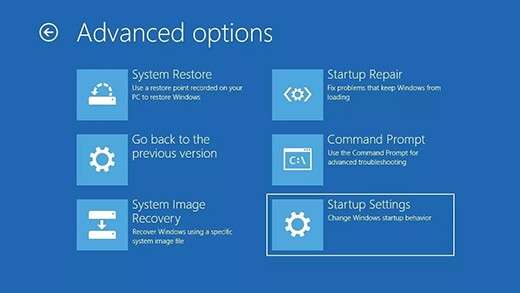
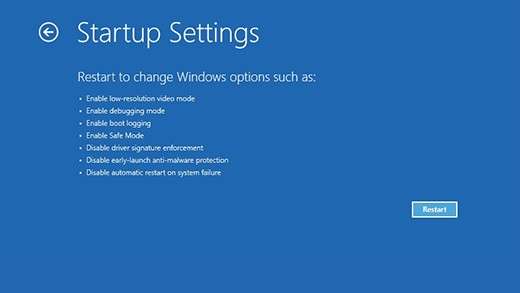
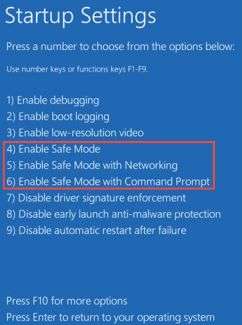
Step 3: Windows should now open up to a new window that says Startup Settings and includes a list of different options. The first Safe Mode options should be 4, with the other Safe Mode options following after. Press the number key for the Safe Mode that you want.
Method 2: When you’re already in Windows 10
There’s a slightly more roundabout way of booting into Safe Mode from Windows 10. You’ll find this method helpful if you want to shut down safely and restart Windows while preserving as much data as possible — without needing complex command lines.
Step 1: Head to your Start menu, and then choose or search for Settings.
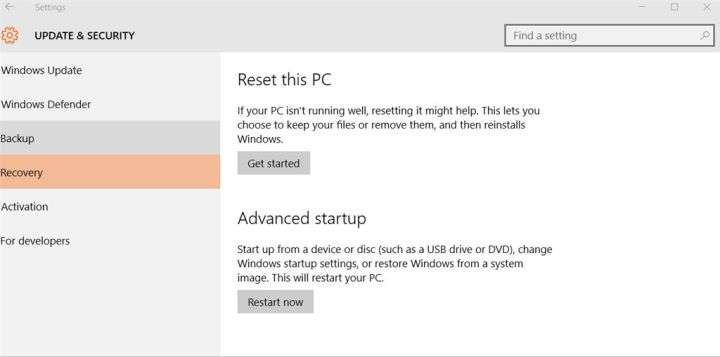
Step 2: In Settings, look for Update & Security and select it. This will open a new window with a sidebar on the left side. In this sidebar, look for Recovery, and select that.
Step 3: Under the Advanced startup option, you should see a Restart now button. Select it and this will take you to the same selection screen as the first method of entering Safe Mode.
Step 4: Move through these menus by selecting Troubleshoot, then Advanced options, then Startup Settings, and then Restart.
Step 5: Give Windows time to load your selection of Startup settings. The Safe Mode options start at number 4. Press the number key for the Safe Mode you want.
Starting from a blank screen
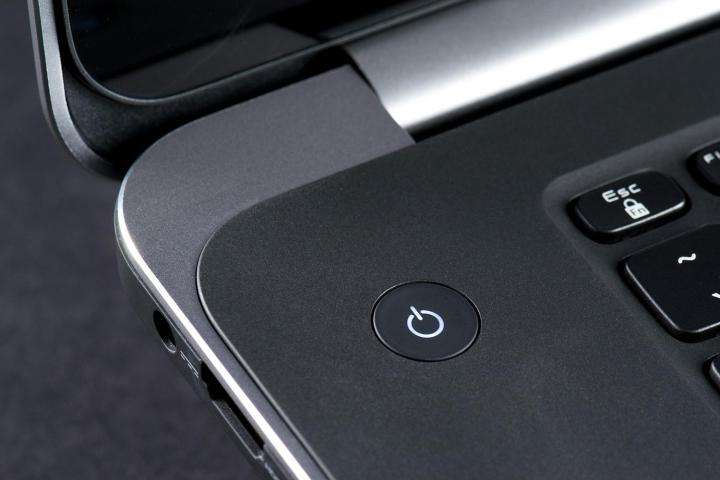
Sometimes your PC will shut down before you can even reach a login screen, or it will refuse to show anything but a blank screen. If you can only get a blank or black screen, your steps to enter Safe Mode are a bit different. Here’s what you should try:
Step 1: Press the power button once to turn on your computer. Now, as soon as your computer gives any sign that it’s on — preferably a manufacturer logo on the screen, but if not, go with spinning fans — hold the power button down again for 10 seconds. You’re giving Windows 10 an SOS signal with these steps.
Step 2: Repeat Step 1.
Step 3: For the third time, press the power button once to turn the PC on, and at the first sign Windows has started, hold the power button down once more for 10 seconds until your device has turned off.
Step 4: Now press the power button a final time. Windows should have received the signal, and will boot up in recovery mode. From here, as before, select Troubleshoot > Advanced Options > Startup Settings > Restart. Then press the 4 key or a similar option for your desired Safe Mode.
Exiting Safe Mode
Once you fix your Windows problem, restoring the device’s original settings will require a few more steps. Follow the ones below to get back to your standard Windows 10 experience.
Note: You can also boot into Safe Mode from Windows by reversing the second part of Step 2.
Step 1: Start by clicking on the Start button. In the search box on your screen, enter MSConfig and click Enter. The computer will then go to the System Configuration feature automatically.
Step 2: Go to the Boot option. Under Boot options and on the lower left of the screen, you should see several options for Safe boot. Select one of those. Ensure that Safe boot is not checked.
Step 3: Now that Safe boot is unselected, choose OK, and opt to restart Windows 10. You can restart the computer as you normally would. From there, it should reopen with its full Windows capabilities.
Views: 4


1 Comment